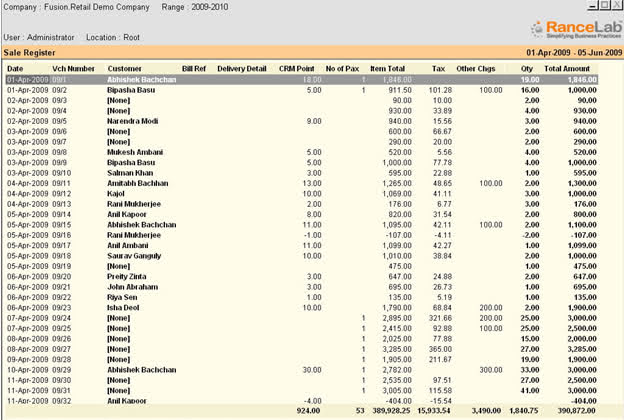
Register:
Register format is viewed by pressing "ALT + F3" from any transaction screen.
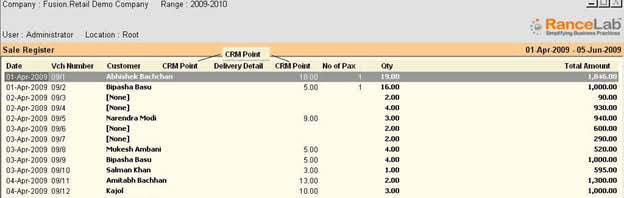
For example, navigate through Main Screen - Sale Management (S) – Report (R) – Sale Register (S) - Click on "-F3 Register" or press "Alt + F3"
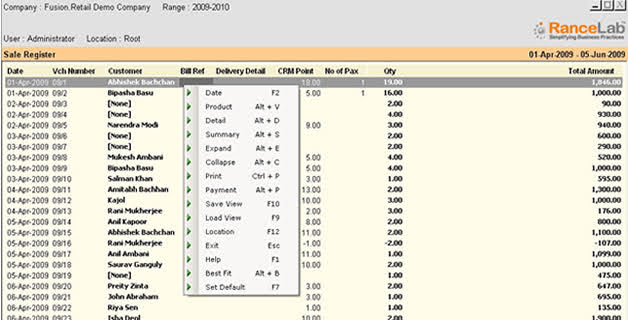
Function buttons at Register:


F2 Date |
To change the Report Date Range |
-V Product |
To change the Register view to Product view |
-V Voucher |
To change the Product View to Register view |
-D Detail |
To display the Register in Detail Mode |
-S Summary |
To display the Register in Summary Mode |
-E Expand |
To Expand the line item |
-C Collapse |
To Collapse the line item |
^P Print |
To Print the Register |
^Del Delete |
To delete one or more selected transactions |
F10 Save View |
To Save currently displayed view |
F9 Load View |
To open a saved view |
F12 Location |
To change the Location |
-W Warehouse |
To change the warehouse. You can choose only one warehouse or more than one together in order to see report for combined warehouses together. |
Exit |
Click Exit button or press Esc button to come out of the current screen. A prompt appears if you attempt to exit before saving |
F1 Help |
To get context sensitive help relating the current voucher. |
-B Best Fit |
To display the register in Best Fit view |
F7 Set Default |
To set currently displayed view as Default Register view |
-F11 Chart |
To display chart for on-screen data. Report must be grouped and there must be Grand Total of at least single column. |
F11 Pivot |
To display register in Pivot format. Report must be grouped and there must be Grand Total of at least single column. |
^H Search |
To get Auto Filter Row, to hide the Auto Filter Row press CTRL + H again Related Faq: My reports are too much long. Is it possible to search dynamically any data in reports? Is it possible to define a parameter while generating sale report? |
^K Formatting |
To do conditional formatting for the report. Related Faq: |
-K Add Column |
To add a new column. Related Faq: |
-F8 Rpt Param |
To set the report parameter such as date & time range, mode detail/summary and location. |
^G Prod Diag |
It shows various particulars of the Product like, Code, Department, Group, Sub Group, Brand, Unit, Tax, Re-order Level, Safety Level, Re-order Quantity, Min-Order Quantity, Stock, Product Type, MRP, Batch No., Mfg Date and Expire Date etc. Note: This will work only in Product View Report, not in Register View. |
-F10 Audit |
Use to enter Audit Remark for the transactions. Once a transaction audited, you cannot remove that. However you can remove the same after make it unaudited.
Enter Audit Remark is very Simple: 1.Open report in Register View 2.Select a transaction row 3.Press –F10 or click on this button “-F10 Audit” 4.Enter the remark and the click on Ok. 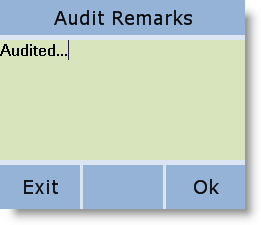
Make Unaudited the Audited transaction; 5.Open report in Register View not in the Product View 6.Select a transaction row 7.Press –F10 or click on this button “-F10 Audit”. 8.Click Yes.
Note: This will work only in Register View Report, not in Product View. |
-F5 Ex Cols |
Use this button if you want to hide one or more columns of Column Chooser. By doing this you can hide unwanted fields of Column Chooser to minimize the crowd which helps in searching of required fields faster.
Hiding the fields of Column Chooser is very simple; 1.Press F5 or click on this button “-F5 Ex Cols” 2.Press ALT + L to select the fields that are not required 3.Click on Ok. 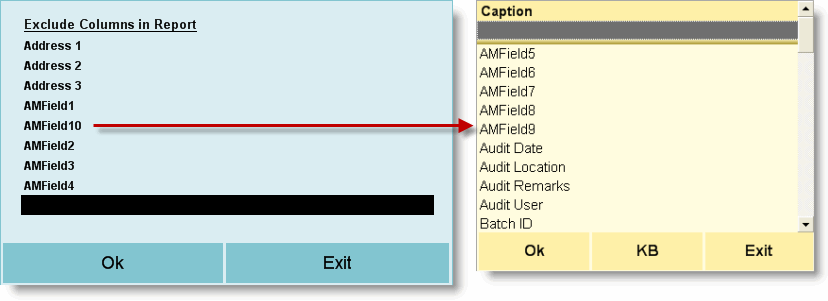 |
Note:
•Press F5 key in any report for reopening in order to see the updated data. No button has been added for this, you just need to press the F5 key.
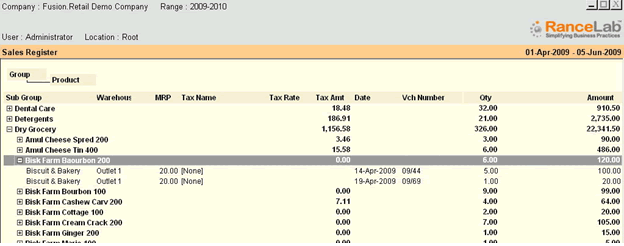
Product View (-V Product):
Displays register in Product View expanding product hierarchy to view a register more clearly.
Detail and Summary View (-D Detail, -S Summary):
Expands and Collapses additional columns of displayed vouchers
Expand and Collapse View (-E Expand, -C Collapse)
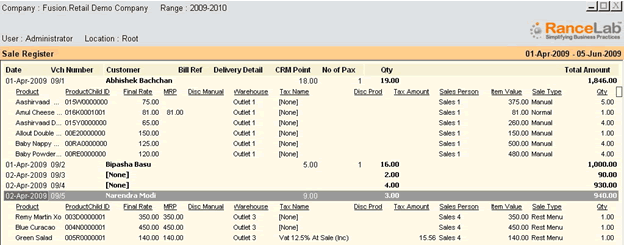
Expands and Collapses rows (line items) of selected Voucher
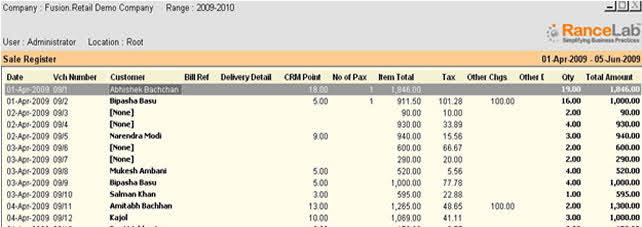
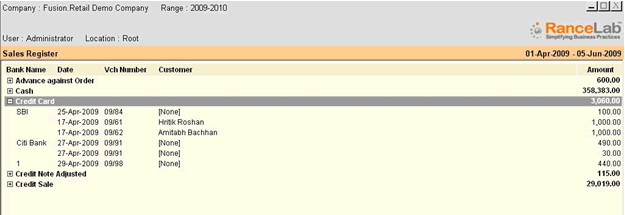
Payment View (-P Payment):
Available in Sale Order, Sale and Sale Return Register. Display the register Mode of Payment wise. It groups all vouchers on the basis of transacted Modes of Payment. You can expand and collapse each or all lines to see the transaction details in each Mode of Payment.
Drag and Drop Columns:
Use left mouse click to drag a column from its original position (as shown in picture below) to destination location.
Right Click:
Use right mouse click (on data area) to display all the function buttons in a drop down menu.