Main Menu > Sales Management > Transaction > Sales Order
After the Items to be sold, the customer and the terms of sale are determined, a Sales Order is issued to the supplier for supply of specified Items. Often, the buyer of the Items submits a Purchase Order from which the Sales Order are entered.
The Sales Order contains the specific Particulars of each item with complete specifications, attributes if any (like Brand Colour, size etc), Quantity, Sales Rate etc of each Item, Additional Charges (like Taxes etc), Discount if any, delivery & payment terms, etc.
The buyer normally issues a Purchase Order to the Supplier. The supplier, in turn, enters the buyers purchase order as its Sales Order. In retail, normally Sales Order management is not significant, as customers buy and take delivery instantly. However, in specific ordered goods, Sales Order Management system is important. In wholesale, normally sales order system is maintained where there is some time lag between Order & Delivery.
Note : Placing of Sales Order does not affect Inventory (Stock) or Accounts (Account Ledger Balance)
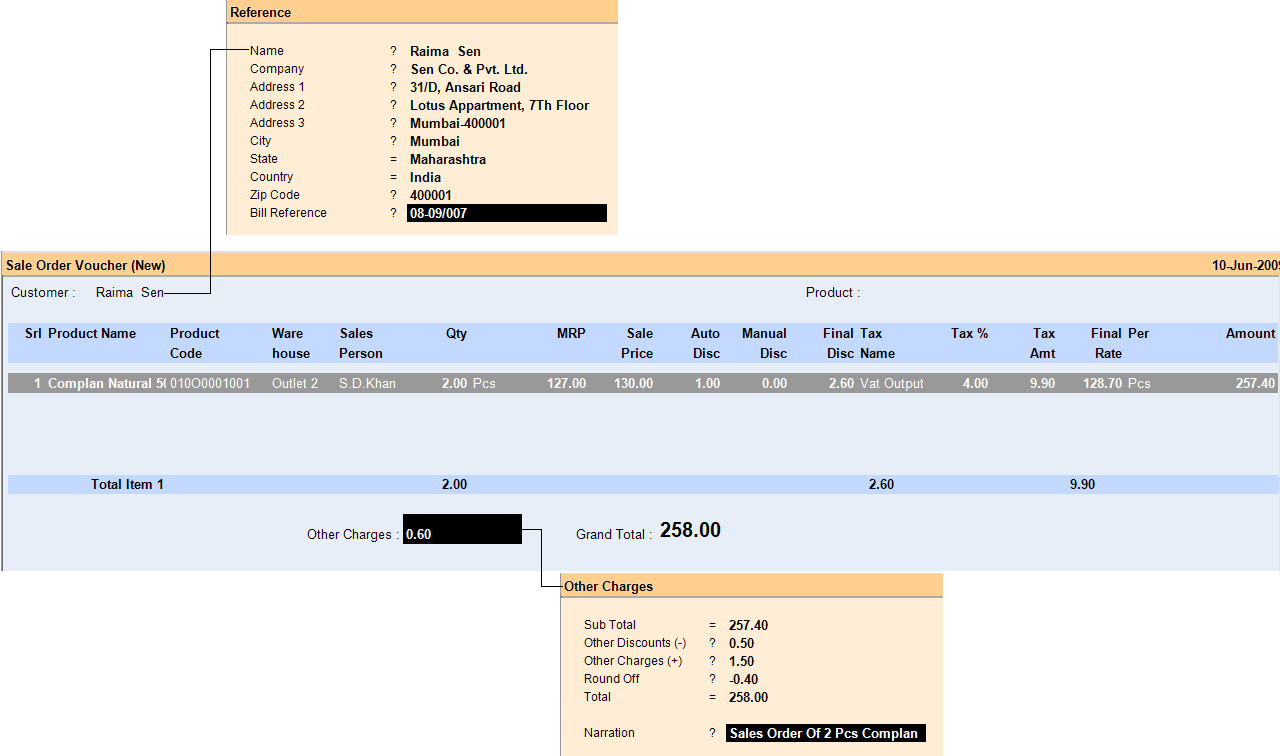
At the Header you enter Customer Name
Customer
|
Press ALT + L and select the Customer from the list. The customer particulars are shown in a window for reference. You can enter any particulars of the bill (like Challan No etc) at Ref Number field that appears here. Press CTRL + N to create a new Customer.
|
At the Header you enter Product Name
Product :
|
Press ALT + L and select the Product from the list. Press CTRL + N to create a new Product.
|
Rate
|
Rate is displayed from Product Master or stock inward entries which you may change. Else, if Ask Rate is set to yes in Product Master, a small window appears where you have to enter the Rate of the Item at which the order is taken from the customer.
|
Quantity
|
If Ask Quantity is set to Yes in Product master, a small window appears where you have to enter the Quantity of the ordered Item., otherwise 1 is carried as default which you may change.
|
|
At detail line, the following particulars of each Item ordered are displayed:
Srl.
|
Serial Number of the Item displayed (like 1).
|
Product Name
|
Name of the scanned or selected product will be displayed.
|
Product Code
|
Code of the scanned or selected product will be displayed.
|
Stock
|
Current Stock (Stock-in-hand).
|
MRP
|
MRP as entered during stock inward entries, if any, is displayed.
|
Sale Price
|
Enter the Sale Price for the Product (You may change this by pressing F5, if user rights are given).
|
Auto Disc
|
Auto Discount % carried from product master at Product discount field or from the Price List, if selected. The difference of MRP and Sale Price is displayed as discount only on PoS bill printing.
|
Manual Disc
|
Click Discount button to enter additional discount amount (within the limit allowed to the PoS operator).
|
Final Disc
|
Computed as per Auto & Manual Discount.
|
Qty Unit
|
Enter the Sale Quantity for the Product in the bill (by default its 1, you may change it by pressing F3 - Add Qty or F4 Less Qty).
|
Tax %
|
Tax percent is carried from product master or price list.
|
Tax Amt.
|
Tax amount computed as per product value, discount & Tax Rate calculated on (Grand Total – Final Discount) is displayed.
|
Final Per Rate
|
Net unit rate (after discount and tax).
|
Amount
|
Net Product Value after Discount & Tax.
|
|
A small window appears where you have enter following details:
Sub Total
|
The Net Product value of all Items is shown here.
|
Other Discount (-)
|
Enter any amount to be reduced from the Bill Value (like Discount etc).
|
Other Charges (+)
|
Enter any amount to be added in the Bill Value (like Freight, Transport).
|
Round Off
|
The computed fraction amount to round off the net order amount is displayed.
|
Total
|
The rounded off Net Order Amount which is payable is shown.
|
Narration
|
Enter the narration for the Order, if any.
|
The net amount of other charges as entered in the Other Charges window is displayed in the main voucher screen
|
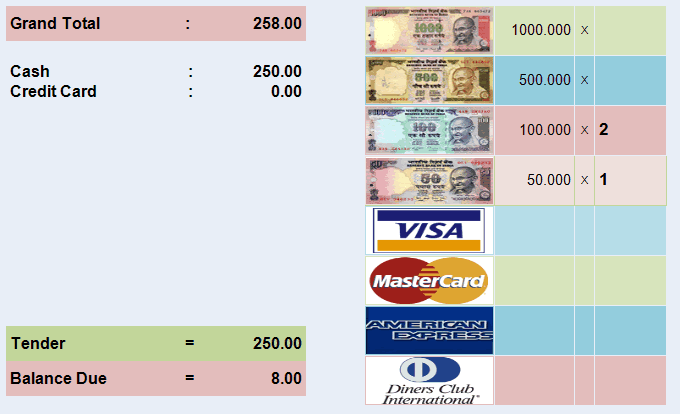
After entry of all particulars of the voucher, you get the Tender screen where you enter the details of payment mode. It has 2 parts. In right part, you enter the denominations of Cash received. The total amount of cash received is carried in the Cash column in the left part, as follows:
Grand Total
|
Price figure is shown here.
|
Cash
|
The total of cash received as per denomination is displayed here. Alternatively, total amount of cash received may be entered here.
|
Credit Card
|
If customer purchased in credit card. You enter the amount paid through Credit Card.
|
Tender
|
The total amount paid (in all modes) is shown in Tender Field.
|
Balance to Return
& Balance Due
|
If the total tendered amount is more than the bill amount (this can happen only when some amount is paid in cash) , the amount refundable is shown here. If the total tendered amount is less than the bill amount, the amount Due is shown here.
|
If no payment is immediately received (e.g in Credit Sale), you have to over type the value in Credit Sale line item in Tender screen. The whole bill amount remains as due
Why we are using tender screen in Sale Order Screen & what will be the accounting effect, & by default which ledger is involved?
Ans: The tender screen is used to accept advance payment from a customer while she is placing the order. There can be different mode of payment for accepting advance like Cash, Credit Card etc.
This helps us to cut down the additional accounting (receipt voucher) entry. It also creates a reference so that when the customer comes back to take deliver, the balance payment is shown to the operator.
An accounting voucher entry is passed automatically with
•Cash or Credit Card A/c (as per MOP selection) debited •and Advance Against Order Ledger to be will be credited •and a Ref No is also generated by default to track down the order during final sale entry.
How the advance received against Sale Order is to be adjusted against Sale in due course ?
Ans: When you select a sales order (with some advance) during a Sale Bill entry, the Advance Agst Order MOP in tender screen will be filled by the advance amount. The balance payment (if not zero) needs to be filled in either of the other MOP’s.
|
Buttons in the Sale Order Voucher are as follows:


F3 Add qty
|
Click F3 Add qty Button or press F3 key to add the quantity of product. For example if the quantity entered is 5, but you want to make it 8 either you over type 8 at the quantity column (you have to use mouse) or click F3 Add Qty button (from keyboard without using mouse) and type 3 to add 3 in the current quantity (5) to make it 8
|
F4 Less qty.
|
Click F4 Less qty Button or press F4 key to less the quantity of product. For example if the quantity entered is 5, but you want to make it 3, either you over type 3 at the quantity column or click F4 Add Less Qty button and type 2 to deduct 2 in the current quantity (5) to make it 3
|
F5 Rate Change
|
To change the Sale Price. Click at F5 Rate Change button bar or press F5 button key. The cursor goes to rate field directly. Over type the Rate
|
F6 Sale Person
|
To enter Sales Person Name. Click F6 Sale Person (or F6 key) and select the Sales Person (you may select NONE if no Sales Person is to be linked or you may want to de-link associated sales person)
|
F8 Prod Info
|
It shows various particulars of the Product (like, Code, Department, Group, Sub Group, Brand, Unit, Tax, Re-order Level, Safety Level, Re-order Quantity, Min-Order Quantity, Stock, Product Type, MRP, Batch No., Mfg Date and Expire Date etc.) in the product information window, when you click at F8 Prod Info button or press F8 button key.
For more detail please visit:
Is it possible to view the supplier name in Product information?
|
F9 Cust Info
|
It shows various particulars of the Customer (like Customer’s personal details purchase history, club membership points) in the Customer information window, when you click at F9 Cust Info button or press F9 button key.
For more detail please visit:
Is there any option to check if a particular customer is allowed for credit sale or not?
|
^L Deliv Detail
|
Click "^L Deliv Detail" button or press CTRL + L button key to specify delivery details/address where the materials are to be delivered
|
F10 Tender
|
Click F10 Tender button or press F10 key to show the Tender Screen
|
^T Item Remark
|
Click "^T Item Remark" button or press CTRL + T to get the window in which the Item Remark of the Product displayed (if specified in product master), which you may change. The change is saved in the specific voucher against line item and not in Product Master
|
^M Item Disc
|
Click this button or press CTRL + M to enter Item discount either in amount or in percentage and either for a single selected item or for all of the items.
For more detail please visit:
Is it possible to calculate discount and charge on sale rate and calculate tax on the amount after charge added to the sale rate?
|
F2 Date
|
Click at F2 Date button bar or press F2 button key for enter the Date of Voucher.
|
-O Opt Voucher
|
Click at "-O Opt Voucher" button or Press ALT + O to get the Sale Order Option screen and to set Sales Order options
|
-W Opt Prn Win
|
Click "-W Opt Prn Win" button or press ALT + W to get Sales Order Window Print Option and set the options
|
-D Display
|
Click at "-D Display" button or press ALT + D for display all entries of Sale Order Voucher
|
-R Opt Prn Rec
|
Click this button or press ALT + R to get Sale Order POS Print Option and set the option
|
-T Change Tax
|
Click at T Change Tax button or press ALT + T. to get Tax rate list and select the Tax Rate. Tax selected here will be applied on entire voucher. To change tax of a line item, go to respective line on the tax column and press Alt+L to get the list of tax to change.
For more detail please visit:
•What is the process of calculation of tax in sale and purchase? •How can the Tax be calculated on the actual item rate even after giving the discount? |
-P Price List
|
Click this button or press ALT + P to select different Price List
|
-L List
|
Click at "-L List" button or press ALT + L to get the list of respective master and select an master item.
Related Faq:
•What to do if the Product Name doesn't show in the list during sale? |
^D Delete
|
Press CTRL + D key to Delete the Voucher. To delete a specific line item, press ALT + D Delete on the line Item
|
^P Print
|
Click at P Print button or press CTRL + P for print the Voucher
|
F12 Change Loc
|
Click "F12 Change Loc" button or press F12 to change the location. The entire voucher will be moved to the selected Location. Location is applicable for entire voucher but warehouse can be specified for each line Item
|
Exit
|
Click Exit button or press Esc button to come out of the current screen. A prompt appears if you attempt to exit before saving
|
F1 Help
|
Press F1 to get context sensitive help relating the current voucher
|
F7 Customer
|
Click this button or press F7 to select customer from the list
|
-V Preview Dgn
|
Click "-V Preview Dgn" button or press ALT + V to get the design screen to change the output format of the Voucher Document
|
-F3 Report
|
Click "-F3 Report" button or Press ALT + F3 to view the Order Register on screen
|
^V Rec Vch
|
Click this button or press CTRL + V to enter Receipt Voucher
|
-E List Editor
|
Click this button or press ALT + E to get the List Editor screen to change the list setting for the transaction
|
-F11 Chg Voucher
|
Click this button or press ALT + F11 to select different Voucher Type for the transaction
|
-U UDF
|
Click this button or press ALT + U to enter data for User Defined Fields
For more details please visit:
How to add details like Transport No / Policy No in Sale Invoice (Scan POS)?
|
^O Charges
|
Click this button or press CTRL + O to enter Item wise charges either in amount or in percentage and either for a single selected item or for all of the items
|
-F6 Scale Input
|
Press ALT + F6 to get weight input from the weigh scale.
|
^F11 All Column
|
Click this button or press CTRL + F11 to view item wise transaction detail showing all deductions and additions to the item rate.
|
-B Rate Type
|
Click this button or press ALT + B to change item rate type MRP / Purchase Cost / Sale Rate. Where choosing MRP item will be sold on MRP, choosing Purchase Cost item will be sold on P. Cost and choosing Sale Rate item will be sold on sale price.
|
-F8 Check Stock
|
Click this button or press ALT + F8 to view salable stock (Closing Stock - Sale Order + Purchase Order) available in all of the locations
|
F11 Create PCID
|
Click this button or press F11 to create item entry with matrix same as Purchase. You can book sale order entry for an item of any type of matrix without doing Stock Inward entry any kind. Item child will be generated directly from here.
|
-M Redeem Cpn
|
Click this button or press ALT + M to Redeem the Discount Coupon. Process is same as in the Sale Invoice (Scan POS).
|
-H Home Deliv
|
Click this button or press ALT + H to prepare Home Delivery order.
|
^R Scheduler
|
Press CTRL + R or click this button to schedule a selected onscreen SPA Service Product.
This button will work only if Sale Order Voucher opened from the Reservation (SPA), then the ordered products will remain exists even after being saved, subsequently you can schedule a selected onscreen SPA Service Product using this button.
|
-F6 Scale Input
|
Click this button or press ALT + F6 to get input of Weigh Scale.
|
-Q Calc Qty
|
Click this button or press ALT + Q to calculate item quantity based on the sale amount entered. This is useful in sweet shops where customer asks to pack sweet of certain value in rounded figure.
For example: If a customer asks the sale person to pack "Kaju Barfi" woth Rs.500/- which is Rs.350/- a kilo, then it seems to be very difficult to back calculate and then put the quantity in a busy sale counter.
In order to calculate item quantity for the sale amount entered, please follow the steps given below:
1.Select the item entry row and then click this button or press ALT + Q 2.It will ask for Amount. 3.Enter Amount and it will calculate Qty.
Note:
•Discount or Scheme will not be considered while calculating Qty. |
|
Require to print UDF in Sale and Sale Order POS Printing
In Sale POS Printing options, it is required to print UDF fields.
In All Sale Transaction - under Print option (Alt+R) - add an option
“Print UDF = No/ Yes/ Below Item”
Below Item - UDF will be printed below the item name.
Template Function to select a bunch of items in one go to speed up the entry of inventory vouchers.
Scenario:
1.During entry in stock transfer indent or physical stock voucher, we need to select many items manually every day, that might be time consuming and erroneous.
2.While selling gift baskets in a bakery with the different items in it with different tax. With template function, you can now select those items in one go.
3.Physical stock entry usually has a fixed number of items. The operator is required to just fill in the qty. You may use the template function to speed up the process.
Solution:
The template system is used to create a bunch of items to be used during the entry of inventory vouchers.
Template System:
●To Create a Template: Open any supported module. Select required items and then Save Template (Alt + J)
●To Modify a Template: Load Template > Modify > Again Save Template with the same name.
●To Use an Existing Template: Load Template (Alt+K): It will show the list of available templates > select the required > it will populate the items.
○The load function can be used in running invoice also.
●To Delete a Template: Del Template (Alt+X): It will show the list of templates > select template > It will ask "Do you want to delete?”
●To Print a Template: Prn Template (Alt+Y): It will show the list of templates > select template > It will print that particular template. You may use this print to stick on the box as a packing list.
Supported Modules: The Template Function is available in the following modules:
1. Physical Stock
2. Stock Transfer Indent
3. Sale Order / Sale Invoice (STT and STS) / Sale Challan
Notes:
●Touch POS: If the item in the template is not on the menu, it will not load because we must have a KOT printer defined in order to make an STT sale.
●Item Active or Inactive: There is no check for the active/inactive item while loading the template.
●You may also define the qty for each item while creating a template.
●If we save any touch POS template without qty then it will load the template with minimum 1 qty.
●The template data travels and works in a multi-location environment just like masters.
Added a process for sale order approval or rejection based on credit limit.
Scenario: You may need a sale order approval system based on credit limit.
Solution :
●In (S>T>O) - Voucher Option, we have added an option called
○Activate Approval = No/Yes/On Credit Limit
●Added in Designation Master > Action
○Allow Sale Order Approval = No / Yes
○Allow Sale Order Rejection = No / Yes
●In Sale Order Register added a column Approved = Yes / No / Reject. Based on this column you can use conditional formatting and filter etc.
Approval
●Added a button > Approve > It will work based on users rights.
●On selection this button and if Activate Approval = on Credit Limit
●If credit limit - (Order amount + Current O/s amount) <= 0 then
○System will ask "Credit Limit Exhausted, Do You Want to Approve = Yes / No"
○If Yes then it will be marked as Approved
○It will also save the date, time and user name who approved it.
Rejection
●Added a button > Reject > It will work based on users rights.
●If you click Yes then it will ask for reason and mark it as Reject.
●It will capture the Date,Time and User Name who rejected it.
Once the Sale Order is approved it will appear in
●Sale Order Selection in Sale Challan.
●Sale Order Selection in Sale Invoice.
●It can be printed (it will not print if not approved / rejected).
●On Approval / Rejection, SMS and Email would be sent to the Customer.
