Main Menu > Sale Management > Transaction > Sale Invoice (Touch POS)
Here you enter the details of each Table occupied by a customer, Items ordered and Items served.
You get the Table Layout screen of the default Table Layout (e.g Snack Bar). To select another Table Layout, click Change Layout button and select another Layout from the Table Layout Master list.
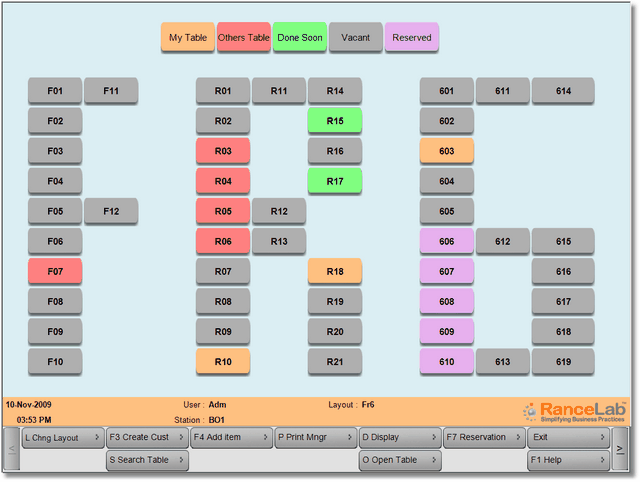
A legend of The Table status is shown as below in different color. Table tablets in the layout are shown in the color as per Table Status, as below:
•My Table: Tables for which Orders have been booked by Currently Logged-in User and neither closed nor tendered (color : Orange).
•Other Table: Tables for which Orders have been booked by operators excluding Currently Logged-in User and not yet closed (color : Red).
•Done Soon: Tables for which all orders have been executed and will be vacant soon, bill not yet paid. (color : Green)
•Vacant: Tables currently Vacant (color : Grey).
•Reserved: Reserved table are shown in Violet color.
To open a Table and make entry of Customer Order, click on the Table.
Tables in any specific layout are diagrammatic representation of physical tables present in a restaurant. You may map your physical view or the layout with using Table Setup
Depending upon the size or area of tables, seating capacity may vary. Set Yes at Prompt to Select No of Pax to prompt an operator to enter number of guests when a table has started. Alternatively, you may click on “No of Pax” button on PoS order screen to do so.
If there are more than group in a Table, say a group of 3 persons and another group and 2 persons in a Table, who order separately and like to be billed separately, you can split the Table.
 Productivity Tip Productivity TipTo save time while entering quantity use "2 x Qty”, "3 x Qty”, "4 x Qty” and "5 x Qty" button.
|

Template Function to select a bunch of items in one go to speed up the entry of inventory vouchers.
Scenario:
1.During entry in stock transfer indent or physical stock voucher, we need to select many items manually every day, that might be time consuming and erroneous.
2.While selling gift baskets in a bakery with the different items in it with different tax. With template function, you can now select those items in one go.
3.Physical stock entry usually has a fixed number of items. The operator is required to just fill in the qty. You may use the template function to speed up the process.
Solution:
The template system is used to create a bunch of items to be used during the entry of inventory vouchers.
Template System:
●To Create a Template: Open any supported module. Select required items and then Save Template (Alt + J)
●To Modify a Template: Load Template > Modify > Again Save Template with the same name.
●To Use an Existing Template: Load Template (Alt+K): It will show the list of available templates > select the required > it will populate the items.
○The load function can be used in running invoice also.
●To Delete a Template: Del Template (Alt+X): It will show the list of templates > select template > It will ask "Do you want to delete?”
●To Print a Template: Prn Template (Alt+Y): It will show the list of templates > select template > It will print that particular template. You may use this print to stick on the box as a packing list.
Supported Modules: The Template Function is available in the following modules:
1. Physical Stock
2. Stock Transfer Indent
3. Sale Order / Sale Invoice (STT and STS) / Sale Challan
Notes:
●Touch POS: If the item in the template is not on the menu, it will not load because we must have a KOT printer defined in order to make an STT sale.
●Item Active or Inactive: There is no check for the active/inactive item while loading the template.
●You may also define the qty for each item while creating a template.
●If we save any touch POS template without qty then it will load the template with minimum 1 qty.
●The template data travels and works in a multi-location environment just like masters.
Qty Multiplication based on Sweets Box Billing in Scan and Touch POS.
Scenario
In a sweet shop, the customer asks for a customised gift pack of sweets. The choice is variable. The customer first decides on the items and qty to be packed in a box. After the contents of a box are decided, they order the number of this customised box. Now the operator needs to multiply the qty of each item based on the required box. It is time-consuming and also leads to errors. For that, a simpler method is required.
Solution:
A button is added: "Multiply Qty".
It will ask for QTY to multiply.
Once the qty is entered, it will multiply the quantity of every item present in the bill.
We will check the "Add Quantity" designation for this functionality.
●It will not run in the case of the Prepaid System.
●We cannot check the Special Modifier in this case.
●Shortcut Key in Touch POS = B
Shortcut key in Scan POS/ Sale Return / Sale Order/ Sale Challan / Sale Order = Ctrl + A
How to Implement GST in Sale Invoice (Touch POS)?
Steps
●Attach CGST + SGST Tax with the Menu (M F M). It will be applicable in all the modes such as Home Delivery, Quick Mode and Table Mode.
●It will always pick CGST + SGST Tax because in a restaurant the location of supplier and place of supply will be always same.
Example:
A Thai Restaurant in Kolkata, West Bengal, provides Thai foods to customer visiting their restaurant and deliver it to home in the city if required. In this example,
●The Place of Supply: The service is performed in Kolkata, West Bengal
●This is an intrastate supply and the taxes applicable are CGST + SGST Tax.
Future Sale Order from Touch POS
In Touch POS (S>T>T) Quick Mode, Table Mode and Home Delivery Mode added two button
●Sale Order: It will open the scan pos sale order module.
●Order to Sale: It will open scan pos sale module to generate invoice against sale order
We have also added a report, Pending Sale Order Register (S>R>P) with following buttons
Print Order (Alt + P): It will print all selected orders in DOS printing
●Order Status (Ctrl + S) = All / Pending / Delivered: to see the report with selected status.
In Designation master following designation has been added
●Open Sales Order from Touch POS = No / Yes / Secure
●Open Scan POS from Touch POS = No / Yes / Secure
●Pending Sale Order Register = No / Yes / Secure
●Print Order from Report = No / Yes / Secure